we have something special for the upcoming holiday season for you: Snowflakes! This was the very first paper I ever implemented in Houdini – what a feeling! I recorded it a while back in summer but then decided to wait until the right season. As the first snow is hitting the Munich area I guess it is about time to release the tut 🙂
The technique stems from Cliff Reiter’s brilliant paper called “A local cellular model for snow crystal growth”. Don’t fret – We’ll do our best and explain what’s actually going on here. In essence it is a rather straightforward yet extremely efficient (and quite clever) cellular automatonwe’re building. Hope we didn’t scare you with that previous sentence. Relax – all we’re doing is simulate small particles of water that are allowed to move in a hex-grid. Enough talk, let’s build it!
Download Project File (.hipnc)
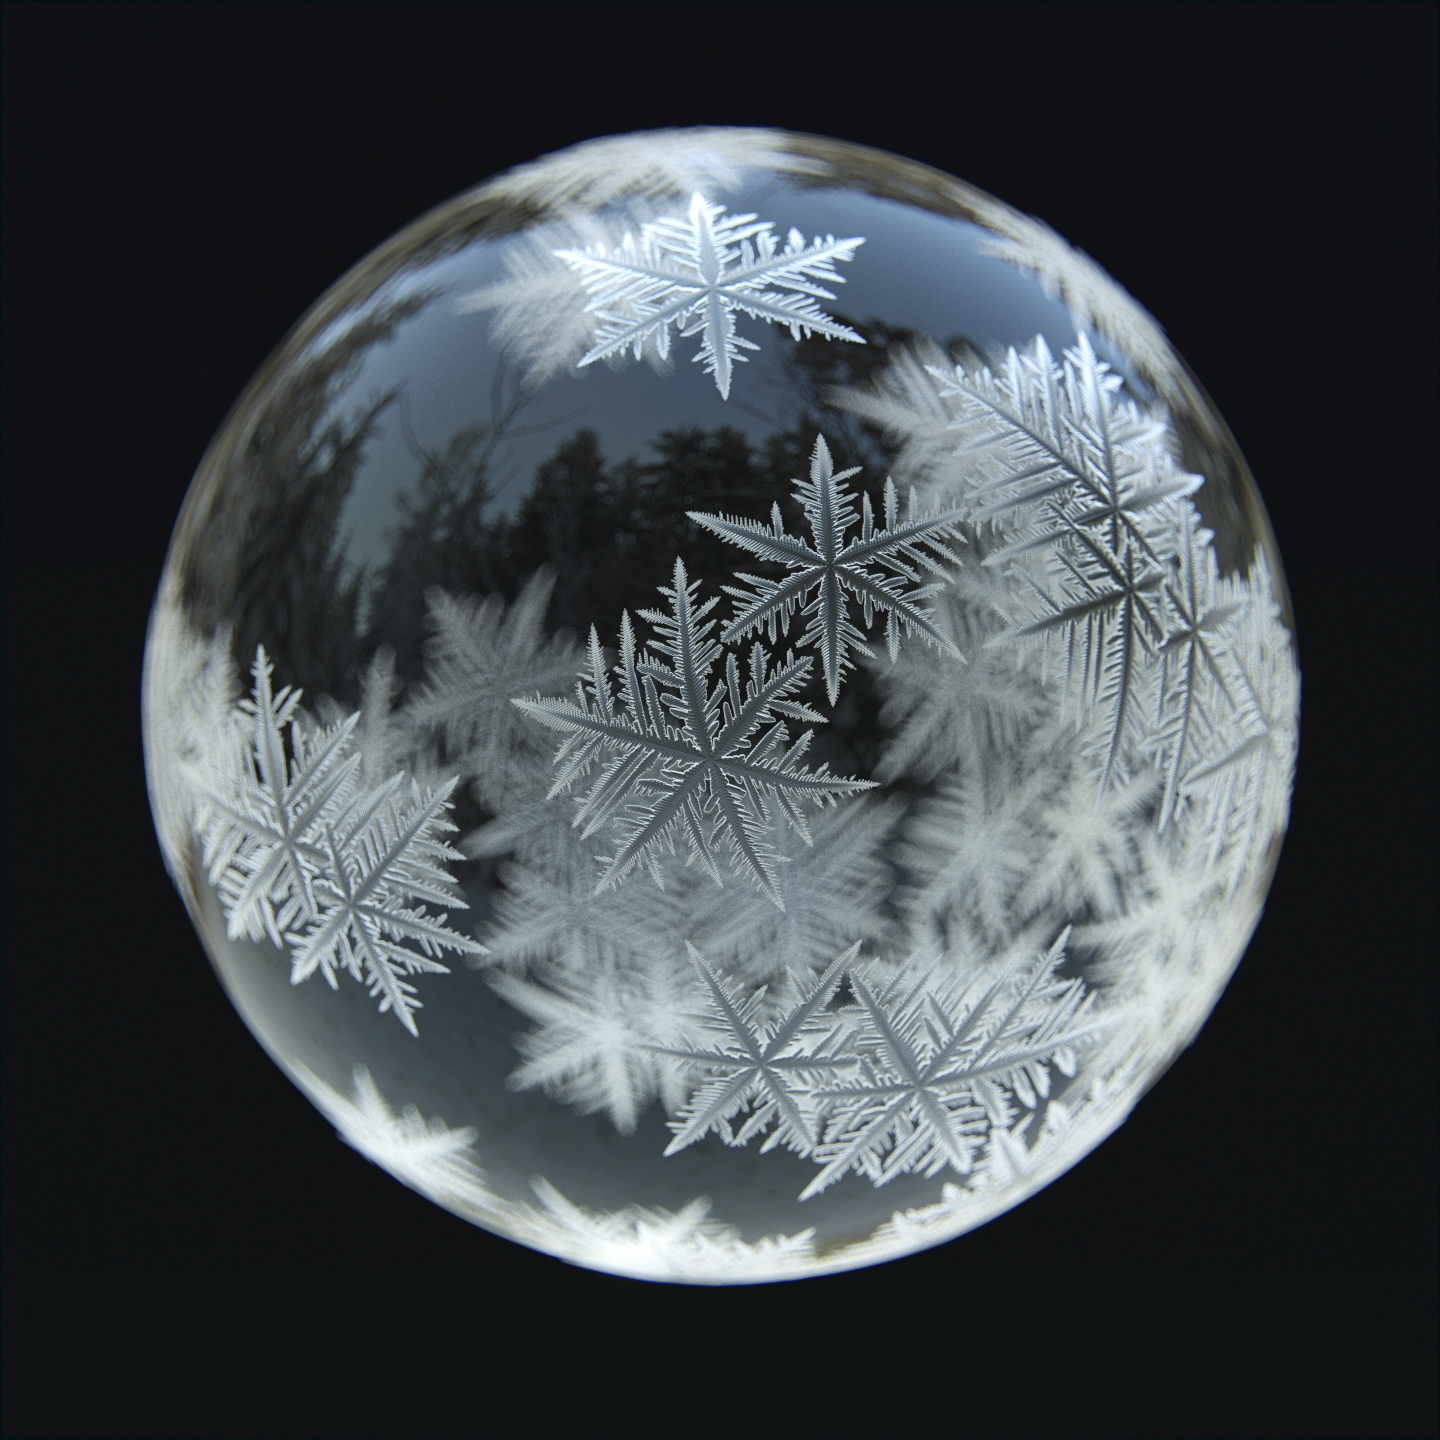
Patreon Special: Frozen Bubble
As a bonus (because we’ve been asked how to achieve this effect) we created a freezing bubble setup which you can access through our Patreon. It can be used to generate images such as this:

Pingback: Schneekristalle in Houdini erstellen - DIGITAL PRODUCTION
Cool!!
Moritz,
tell me why in “blast in the 17th minute” puts to me (not: ice), and then I click on play and it does not allow snow to appear ?
its very tricky when you try to understand the evolution of certain patterns, xDD
Re thanks, you are a great source of inspiration.
I also made the sphere on triangulated sphere. Here my renders
https://discourse.mcneel.com/t/snowflakes/51129
First of all thank you for the great tutorial as always.
I am a bit confused by a simple thing in this tutorial, maybe someone can help me figure this out. The question concerns only the first 3 nodes: Grid, Points from Volume and Connect Adjacent Pieces. How come that having the Point Separation set to 0.01 in Points from Volume (as far as I understand this is the distance between points) we set Search Radius in Connect Adjacent Pieces to 0.0051 and we manage to find any points? The search radius is smaller then the distance between points. So we shouldn’t find any points at all. Am I missing something?
Thank you for the answer in advance.
Hi Dima,
when you look inside the connectadjacentpieces-SOP you’ll find a bit of VEX which is there to find close points. This is by default set up to behave like the pcfind_radius function (https://www.sidefx.com/docs/houdini/vex/functions/pcfind_radius.html). This takes into account each point’s radius and looks up nearpoints including this radius. When it doesn’t find any pscale attribute, the connectadjacentpieces-SOP just assumes that each particle’s scale is set to 1.0 and doubles the search radius in order to behave similarly to pcfind_radius.
Cheers,
Mo
Thanks SO much for this tutorial! You guys rock! I’m a 3d artist at an Additive Manufacturing and Prototyping lab. Needless to say, I’m looking at Houdini as my goto method of creating very complex generative structures in Voxels for 3d printing on our Stratasys J750 we will be getting in 2018.
Check out my result, https://www.shapeways.com/product/NQVNZYU2G/snowflake-pendent I made an Ornament for my mom with it.
Do you mean to say statasys have a machine that can print in raw silver! ? as in the element silver?
I would be highly impressed if the answer was yes.
I don’t know why I just saw this – but this is amazing! Very neat! Kudos. Cheers, Mo
Hi Moritz and Manuel,
thanks for your great tutorials! You are doing a lot of pointwrangle coding and I’m a total coding noob. I’m mostly just copying what you are doing while trying to understand the functions but I’m missing the fundamentals – and those are the key to come up with stuff myself. Can you make a recommendation on what programming language to learn that has the most benefit for houdini? Or should i learn specifically the houdini language? If you could point me to a course that is more fundamental I’d be very grateful.
Cheers!
Michael
Hi Michael,
admittedly there is (yet) very little material on VEX that is geared towards the novice user. However as VEX is heavily based on C, we usually recommend learning a C-style language. Those include C, C++, Java, JavaScript, Processing and Arduino to name a few.
For example this course is a neat introduction to JavaScript: https://www.codecademy.com/learn/introduction-to-javascript
And here is an introduction to Processing: https://www.youtube.com/user/shiffman/playlists?view=50&shelf_id=2&sort=dd
Cheers,
Mo
Thanks a lot for taking the time Moritz! Time to step up my game
Hello!
I am currently using your snowflake mechanism to copy many snowflakes to a grid, randomising pscale, offsetting start frames, orientation and type of snowflake. This is then projected onto a sphere using a ray sop. I have spent some time designing a desired freezing effect with these projected grids. Everything looks great – except when I assign a shader, some primitives are not assigned any texture, as if they aren’t there. When the snowlfkae is projected onto a sphere, it is flattened and it seems as though Houdini is reading primitives that are different but in the same place because of the flattening and not assigning texture. Do you have any advice that doesn’t involve completely changing the ray sop mechanism ( I have a project deadline!). I was thinking maybe I could assign a unique name per primitive face before it is projected onto a sphere and then use this id/attribute to ensure material is assigned to each face with a material sop?
Please help!
Thank you
Hi, thanks for the tutorial and the pointer about this awesome paper.
I have made a simple fun-project out of it: https://snowflake.overwhale.com (not exactly Houdini-releated)
Really nice! Loving it. Thanks for sharing!